
Unfortunately to add these pictures/descriptions to FC2 you
will have to do it all manually. It is easy to copy paste the
descriptions. For the pictures you will have to rightclick your
mouse and save the picture into a folder. I like to save it to a
folder on my desktop named Strep Pictures so it is easy to find
later.
From FC2 Help files.......
Adding files
First open your FC2 program. Click on the User Database
Tab.
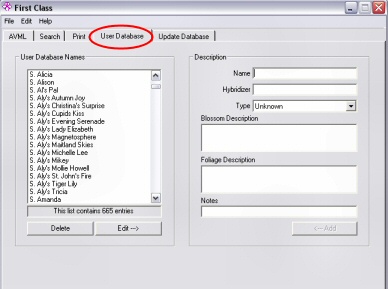
With this part of the program you can add names and
descriptions of cultivars that are not on the main AVML list.
Fill in the Name, etc. on the right.
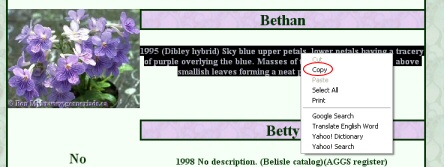
It is easy to highlight the description right from my site by
placing your cursor at the beginning of the description, hold
down the left button on your mouse and drag it over the
description to the end so that it is highlighted. Keeping your
cursor over the highlighted area you then click the right button
on your mouse and click on copy. It should look something like
this.
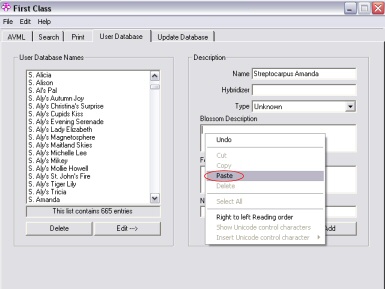
Then you place your cursor over the description area on the
FC2 program and right click the mouse and click paste.
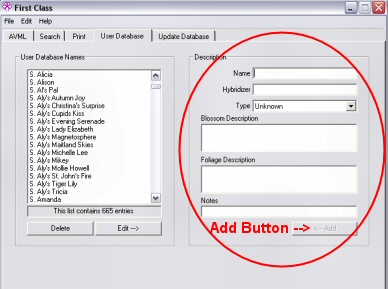
When you have filled it in to your liking click the
[<---Add] button.
The name will be added to the list on the left, as well as the
main AVML list. You may add a personal note directly on this
tab.
Once you add a name to the user database it will be available
for searches, and you can add the name to a print list. The only
difference you will notice is that the words ‘User
Database’ appear in the Alt. Reg. field. If you want to
make changes, select the name of the cultivar you want to change
and click the [Edit--->] button. After making the changes,
don’t forget to add it back to the list. If you want to
delete an entry, select the name on the list and click the
[Delete] button.
Photos in the First Class database are 220 pixels wide and 165
pixels high. If you reduce the photo to this size, it will take
up less space on your hard drive. However, you don’t need
to reduce it in order to use it. The main thing to keep in mind
is that the width to height ratio should be 4:3. In other words,
the height should be ¾ of the width. For example, a photo
that is 640 x 480 pixels would work well. If you get too far away
from this ratio, the photo will look distorted when displayed in
First Class.
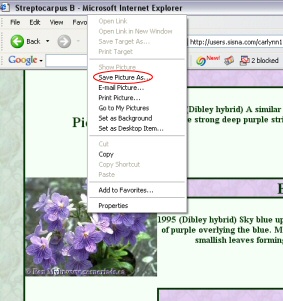
Now to add the picture to the description. First you have to
place your cursor over the picture you wish to copy. then right
click the mouse and click save picture as.... and save it to a
file that you can find easily. I like to make a folder right on
my desktop just for this purpose as you will need to be able to
find it easily.
After you have saved the picture properly you can now add it
to the FC2 program.
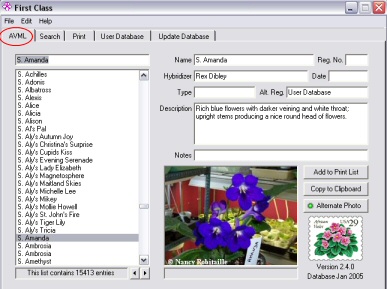
To add a photo, first select the cultivar name from the list
on the AVML tab or the Search tab.
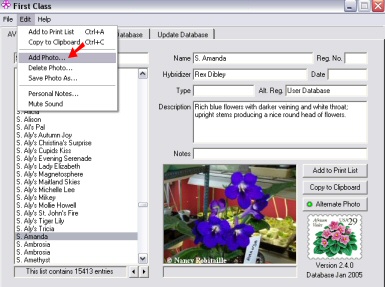
Then select Edit | Add Photo… from the menu.
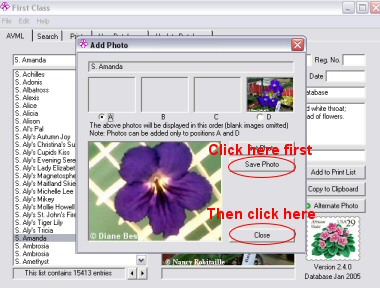
A window will pop up with four thumbnail-size boxes across the
top, labeled A, B, C, and D. If there is a photo available in the
First Class database, it will be shown in the B position. If
there is an alternate photo available, it will be shown in the C
position. Click the [Get Photo] button.
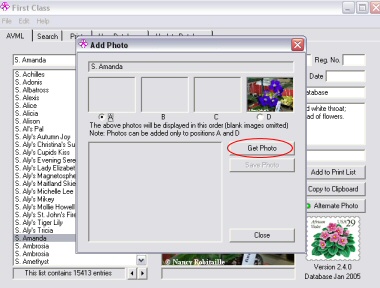
Navigate to the folder where you have the photo stored and
click on the file name, then click on the [Open] button. If you
want your photo to be the primary photo (the one that first shows
up when you display the description), select the A option button.
Otherwise select the D option button. Now click the [Save Photo]
button, followed by the [Close] button.
You now have your picture saved and are done. :)
To delete a photo, first select the cultivar name from the
list on the AVML tab or the Search tab. Then select Edit | Delete
Photo… from the menu. Select the photo you want to delete,
click the [Delete Photo] button, followed by the [Close] button.
Note that you cannot delete photos from the First Class database
(B or C positions).
Now if you want to print them out please follow the directions
below. I will try to get some pictures up to help with this part
ASAP.
With First Class you have the ability to print descriptions of
designated cultivars, or you can save them to a text file that
you can open with a word processing, spreadsheet, or database
program. The first thing you will need to do is compile a list of
the cultivars whose descriptions you want to print (or save). To
do that, first find the cultivar, either on the AVML tab or the
Search tab. Select the name so that its description is displayed
on the right side. [Note: If you are planning to print labels
with photos and there is an alternate photo available, select the
photo you want to use for the printing.] Then click the [Add to
Print List] button (or use the {Ctrl} + A key combination). Do
this for each cultivar you want to add to the list. After you
have compiled the list, click on the Print tab (or press {F3}).
All the names you selected will be on the list. If you want to
delete a name, select it and click the [Delete] button. Or if you
want to start over with a new list, click the [Clear List]
button.
Sometimes you might want to print more than one label for a
particular cultivar. For example, maybe you are selling leaves at
your club’s show, and you want duplicate labels for your
duplicate leaves. In that case, when you are adding the name to
the print list, click the [Add to Print List] button (or use the
{Ctrl} + A key combination) as many times as you want labels.
That cultivar’s name will appear on the list as many times
as you added it. Once you have compiled your list, you might want
to save it for future use. (If you don’t save it, the list
will be lost when you close the program.) Click the [Save
List…] button. Give the file a unique name (such as
“My Minis”) and click the [Save] button. If you want
to recall the list at a later date, click the [Load List…]
button, select the list that you want to recall, and click the
[Open] button. Please note that a saved list does not contain
descriptions — it’s just a list of record numbers
that the program uses — so do not send the list to a
friend, expecting them to have your list of descriptions. (To do
that you need to select one of the File Options on the right side
of the screen.)
Now you’re ready to print. The default font is Arial 10
point. If you want to change it, click the [Change Font…]
button. From the Print Options, select Plain Paper, Labels, or
Labels w/Photo. If you are printing to a partially-used sheet of
labels, click on the label where you want the printing to start.
If you want to change the information that is printed, check or
uncheck the appropriate check boxes. (For example, you might want
to print a listing with just the names and hybridizers listed.)
Now click the [Print] button. The descriptions will be printed to
the default printer. If you want to change the printer, select
File | Printer Setup… from the menu and choose the printer.
If you are printing labels, and the printing is not aligned
properly, select File | Printer Setup… from the menu, click
the Margins tab, and adjust the margins accordingly. The margin
settings will be saved for each printer.
If you want to preview the document, click the [Preview]
button. If you want to print just one page, while previewing the
document, scroll to the page you want to print, then click the
[Print This Page] button. When you are done, click the [Close]
button to return to the Print tab.
If you would like to work with the descriptions in a word
processor, spreadsheet, or database program, you can save the
descriptions to a text file. Click the File Options tab.
Select Text file or Tab-delimited text file, select the
information to include in the listing, click the [Save…]
button, and give the file a unique name. By default it will be
saved to C:\My Documents, and it will be given a .txt extension.
As an alternative you can copy the descriptions to the Windows
Clipboard and then paste them into a document, such as an e -mail
message. When you choose the Copy descriptions to clipboard
option, the [Save…] button caption changes to [Copy]
— click it to copy the descriptions to the Windows
Clipboard.
If you want to check the descriptions before printing, click
the Descriptions tab.